Have you or someone you know ever avoided filling your brow due to the fear of bad eyebrows? Do you constantly live in fear of becoming one of those creepy eyebrow memes circulating the internet? Did you or a close relative ever have your brows plucked within an inch of their lives, only to never grow back again?
Gah. The 90’s.
Brows are scary. Even looking at photographs from yesterday I think to myself, “eh my brows could have been better”. And I know you are all very well acquainted with the big ol’ brows that are so perfectly hairy and magnificent that you can’t even look away because you just want to study that detail like a fine piece of art and somehow translate that art to your own face. Thanks (sike, no thanks) Pinterest and Instagram for that.
Also known as “bitch brows” and often referred to as “Fleeky AF” in certain circles but I am not entirely sure if fleek is cool anymore so be advised.
Here’s the thing about big, bitchy, fleeking brows: up close and in person they are not always the most flattering. PLEASE don’t click away! I promise I will not abandon my quest for the perfect bold brow look when it is merited. All I am saying is that unless you have a lot of time and skill to put into getting fleeked up, I suggest you start small with your basic, subtle brow.
It just so happens that this brow is great for beginners and so perf for summer. The trick is a light hand and to wax dat brow!
I immediate regretted typing “wax dat brow” but I couldn’t stop and it’s there now so…
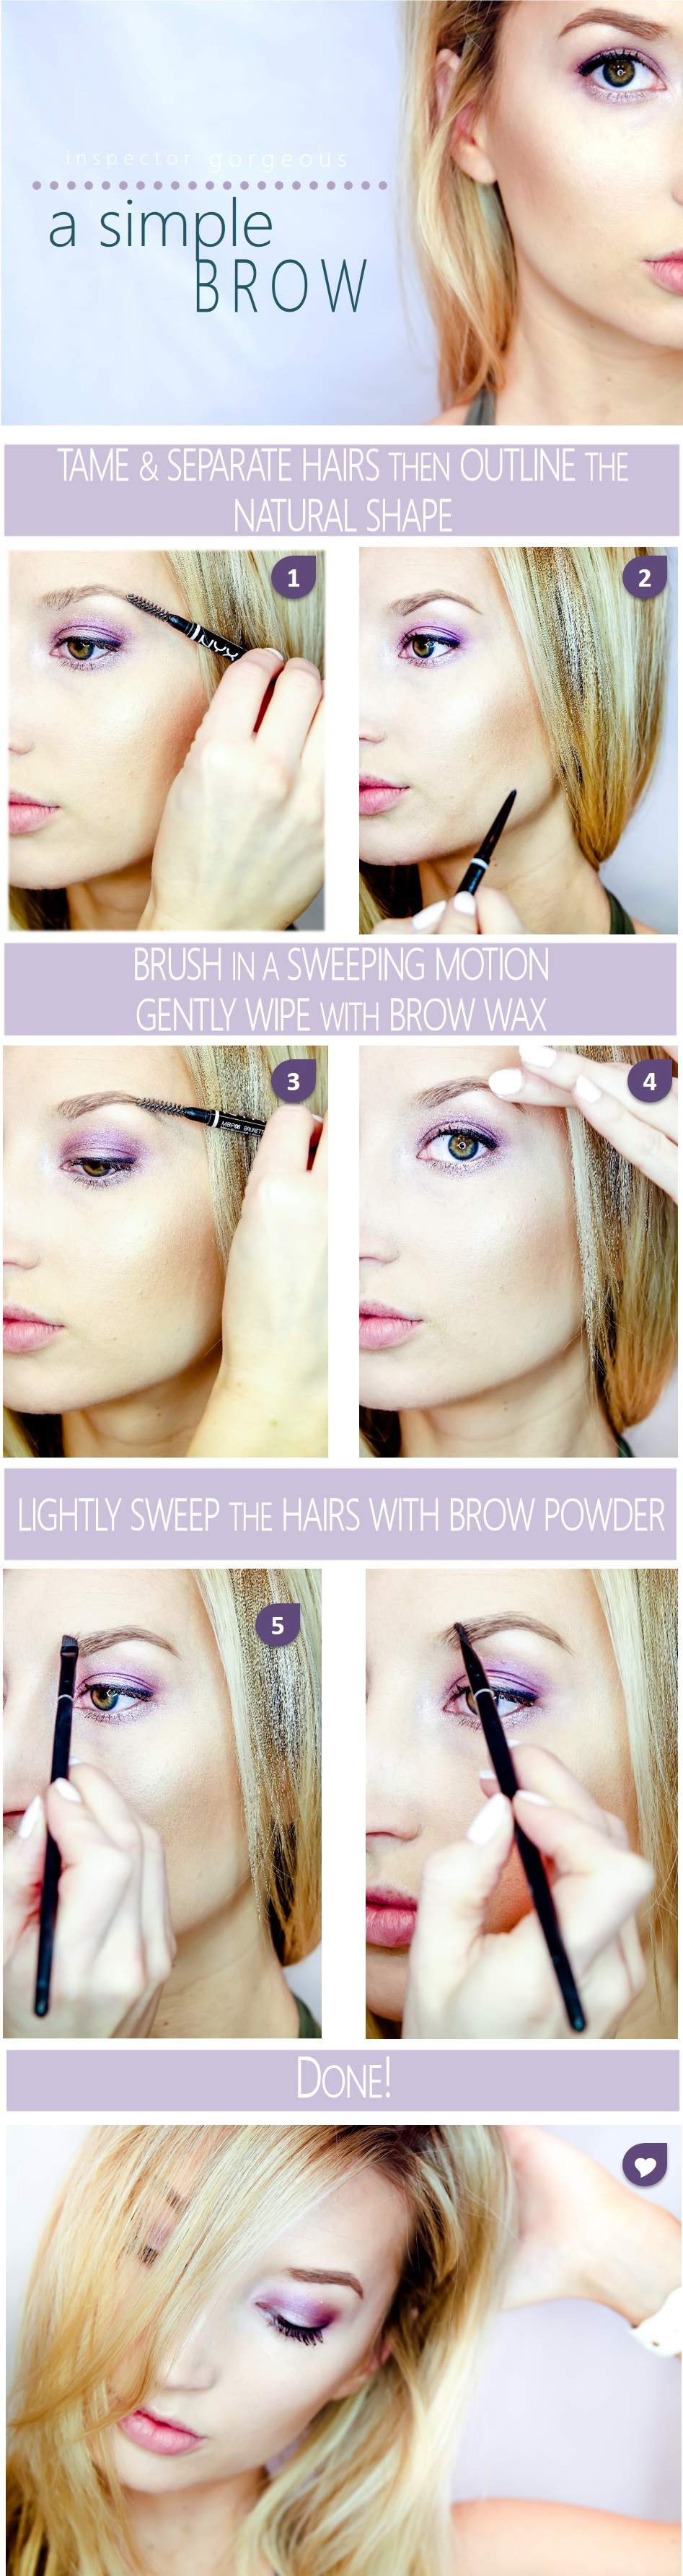
TOOLS:
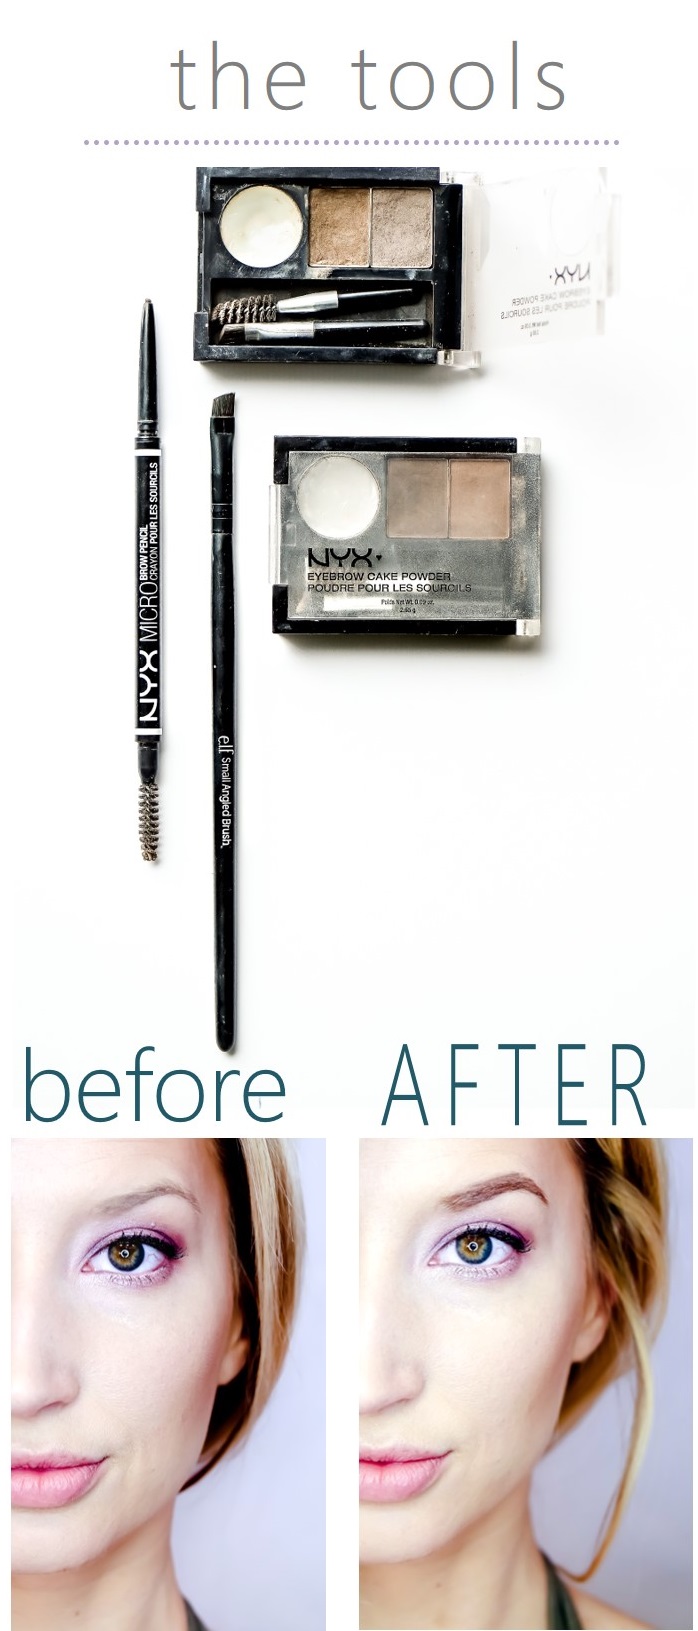
- Super skinny brow pencil-I use the NYX Micro Brow Pencil because the price is right so I can buy a few shades. When I’m pale (winter) I like to have a lighter brow. When I’m tan it is easier to pull off a deeper brunette shade. Personal preference.
- Brow Wax and Brow Powder- The brow wax is the key to this method because it gives the powder something to adhere to. I use a few different varieties but the NYX Brow Kit has the wax and the powder in one (the white waxy circle in the pic above) so it’s super easy for travel. You can also buy it separately when you run out!
- Angled brow brush
DO IT:
- Using a SPOOLY end of your brow pencil (or an old, clean mascara wand) brush the brow hairs up slightly and then smooth out.
- Draw a light line starting at the inner bottom corner of the brow. I like to begin where the hair grows naturally, then slowly extend toward the nose to build a very thin line. Once you are comfortable with the length, use the same technique at the top of the brow, extending the straight line to the top of the arch, then another outlining the tail of the brow.
- Gently use the spooly to blend you line into the brow carefully. It should look natural but defined.
- Using a brush (I use my finger) wipe a small amount of brow wax across the brow. NOW the brow powder will have something to stick to!
- Dip your angled brush in your powder of choice and gently sweep over the hairs, exerting more pressure at the tail of the brow. Imagine that you are barely touching the brow and only trying to coat the hairs with the powder. You can even use the brush to separate the individual hairs of your inner brow and brush them upward as you dust on brow powder. That’s up to you depending on the look you are going for.
That’s it! I’ve really been in love with these natural brows lately because they look so hairy and real. The wax is key for helping the powder stick to your hair rather than only filling the space between.
TIP-If you have never had your brows professionally shaped, I highly recommend it. Once the brow lines are clean, the day to day stuff is a breeze. If you have very sparse brows, you can definitely fill the bare spots with the micro pencil before adding the wax and powder. AND if that scares you, relax. They sell stencils that can guide you until you feel more comfortable. If you have thicker, fuller brows you may even decide to skip the lining. It’s your prerogative.
So what are your favorite brow tricks for summer? Are you still feeling weird about me saying wax dat brow? Ok, good. Me too.
♥Liz
Hahahahaha! Wax dat brow! Aren’t the micro pencils great? Great tips for a softer look – your brown look great! I need to repurchase the browcake powder!
They really are awesome! You just can’t beat the price for how they work. I should seriously buy stock in that company haha!
Your brows looks fierce guuuurl! I am now in need of some nyx brow products, been looking for a new brow powder, and wanted to try ABH dip brow, but a cheaper brand is always a better idea lol!
Serene | I Am Serene L
Thanks girl! I’ve always wanted to try the ABH dip brow but cheaper IS better hahaha 🙂 I still think I might spend the money and give it a try!
Hahaha I need to try the dipbrow look 🙊😂! … Exactly when there is extra cash to splash! Xoxo
Love dat brow! Lookin goooood!. 🙂
You’re right. I definitely need to lighten up. I’m always so dark and bitter. Give me a pencil!
No Ben! I didn’t want you to lighten up. I like you dark and bitter! Bitter Ben Forever!